So, I saw this recipe on America's Test Kitchen a while back and decided that I need to be adventurous and try something Thai. This looked good to me:

I am not going to go step by perfect step through the recipe....as there's no need to reinvent the wheel. The recipe and the video from the show are available at the link above. What I will do is tell you where I tweaked...TWEAKed, not TWERKed..(I HATE THAT WORD) it to accommodate for, well.....for me.
I got all the necessary components over the past two weeks, mainly because I forgot ALL of them the first week. Not much of an investment as I'm sure I'll have the Oyster and Fish sauces for the next decade or so, and with all that vinegar, I'm sure I can wrestle up some sort of homemade, semi-organic cleaning solution if nothing else.

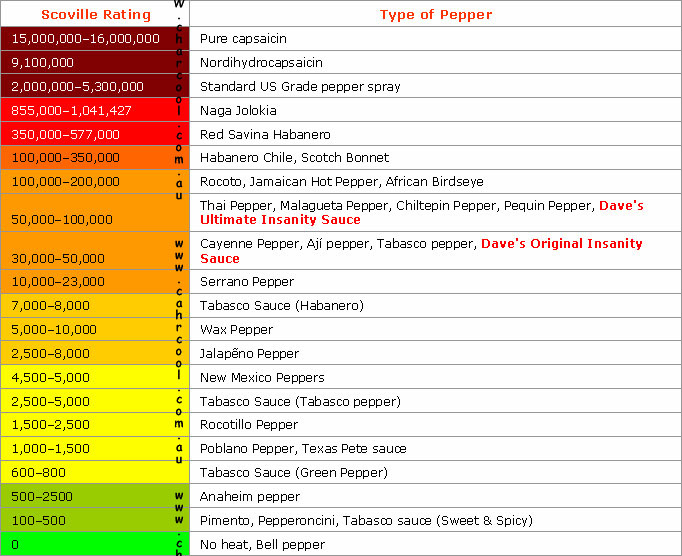
I opted for a much milder Jalapeno, rather than the required Serrano. I like spicy, but THAT much spicy would probably send my last remaining brain cell into the skillet with the rest of the ingredients, and since we're venturing into unknown territory here, I thought it best to proceed with just a modicum of caution.
For demonstration purposes, I timed myself making this, from start (after getting all the ingredients from their assorted locations) to plate. It took approximately 1.25 hours. This includes prepping, cutting, chopping. Hence, if you want to cut back on time, I would recommend making the chile pepper vinegar and the sauce ahead of time....I also am not quite sure what to do with the remainder of my chile pepper vinegar, so for now, it's in the fridge, resting comfortably. I used the required amount in the sauce, and then tossed in an extra tablespoon whilst frying the noodles because I had so much there. It MIGHT kick up the heat factor if you use TWO tablespoons in the sauce and then add one one or two tablespoons to the noodle water when they are soaking? It might. That and I don't know if it would affect the noodles, so live and learn, right?
I suppose the best way to make sure the construction process works smoothly is to do ALL of your prep first. Don't even THINK about cooking it until you have everything ready, as your direct and immediate attention is required DURING cooking.


Warning: If your hands are in any way, shape or form, dry, damaged, cut, or otherwise in rough shape, do NOT touch hot peppers directly. Use gloves or something to keep some distance between you and them. Trust me, I learned from experience. Having worked with a very rough yarn and then going to cook and peeling and chopping roasted poblanos with my bare hands, it was a less than favorable occasion. One that I shall never repeat again. No amount of aloe vera gel or handwashing alleviated that irritation and burning for HOURS afterward!!!
So, after prepping the vinegar, which has to set for at least 15 minutes, this is how I proceeded:
Chop the chicken up. The method shown on the Test Kitchen's site is pretty spot on. Do it. First, trim off any fat or gross bits, however.

Add the required amounts of water and baking soda, stir it up and set it aside. The recipe requires it to sit for 15 minutes. I exceeded that time by about 7 minutes. I will not show you what it looked like after stirring. It's rather vulgar to look at, especially if you have a juvenillesque mind like me!

Actually before you start chopping the chicken, put the water for the noodles on to boil. This picture clearly demonstrates my need for new pans/pots/whatnot. I do like how the wispies appeared in the picture though. This also demonstrates my need to demonstrate that REAL people also cook and use less-than-picturesque cooking apparati in the process. This picture ALSO demonstrates that if I can boil water, so can you!

Now that you've got the chicken and the vinegar resting quietly, you can work on the noodles next.....
Here are the rice noodles. I don't think I had the right size. Mine were very skinny and not the same brand as theirs. I also had a 14-ounce package, so I eyeballed it and used a bit over half of the pack. In the future, I will just throw in the whole thing.

Add the boiling water, as directed and let these soak. I set the timer for 4 minutes, because if I didn't I would forget to stir them halfway through. Stir, then let soak another 4 minutes. After they soak for the 8 moments, rinse them off with cold water then toss them back in the bowl and add the veggie oil and stir them gently to keep them from getting sticky.

Whilst the noodles are bathing, start prepping the garlic. Peel the cloves and then slice them, thinly. Reminds me of Goodfellas...the men were in prison, making marinara and the guy talked about using a razor blade to slice the garlic so thin that it melted in the pan. THIS is not that thin. For THAT, I would need an actual razor blade or an acceptably sharp knife. Had neither. Carried on.

I did substitute regular, everyday broccoli for the broccolini, which I could not find. I wasn't sure if broccolini was the same thing as broccoli rabe, or rapini, and I know that rapini is a bit bitter, which I did not want, so yeah, here we are at broccoli. I only used the heads, as I was being lazy and didn't feel like peeling and chopping up the stems. You CAN do that, however, if you so wish.

Make the sauce...quickest part of the entire recipe.....I don't think I ever knowingly had Oyster OR Fish sauce before and certainly have never cooked with it. It's not too shabby.

After the chicken has finished its baking soda bath, put it under the tap and rinse it really well to remove any residue. Set it over with the vinegar and the noodles.

See? This is KEY to making things at least FLOW smoothly once you start to cook everything. Get it all ready and THEN cook....there is just no free time betwixt cooking steps to do other stuff...unless you want burnt items in your stir-fry. Bonus hint: It really IS easier to put some veggie oil in a dish or a cup first....a lot quicker than stopping, grabbing the measuring spoon and trying to hit said spoon with the oil from the bottle each and every time, which is quite a few with this recipe!!! Do it, trust me.

THIS picture, while not clearly demonstrating how to toast your garlic, DOES demonstrate my need for a better skillet. A skillet like the Test Kitchen uses...a good skillet. This is NOT a good skillet. Wow, this thing sucks. But, you work with whatever you have and this is it...so here we go....
As for the garlic, I have this overwhelming tendency to burn garlic, no matter what. Therefore, I only fricaseed it for about one minute....but way less than two....so as to NOT burn it this time. Whatever you do, NEVER walk away from sauteeing garlic. It will burn the second you turn around. It's evil like that.

Add the chicken and sauce, as directed, and stir it all together to combine and lift most of the garlic from the bottom of the pan. This was the odd part......the chicken WAS thoroughly rinsed and drained, and yet when I added it, the baking soda residuals combined with the remaining moisture made it kind of foam and bubble up....and this was the ONLY time I smelled any type of fishiness from the sauce. Weird, right? Make sure you spread the chicken bits out so all the pieces have a chance to get warm and, thusly, cooked. Again, because I am lazy, I cheated and let them cook for about 3 minutes on the first go around and then I stirred them, instead of flipping each little bit over individually.

The most disgusting part, for me....adding egg. Eggs gross me out, but I can do scrambled varietals, so I opted to add two, instead of three.....again, my skillet sucks, so there were not long, lovely pieces of scrambled eggs, just little bits. Seriously, you could probably omit eggs completely, as I couldn't taste them at all.

I forgot to photograph the cooking broccoli, but I must admit that I would probably flash boil it, for about 2 or 3 minutes beforehand, the next time...as I like my broccoli COOKED, not chewy. It would also probably help to have tightly sealing skillet lid that still has its handle so that 60% of the steam did not escape. Who knows. But, if you like your broccoli on the chewy side, just stick with the recipe method....and....a better skillet than I have!

This skillet, while sucky, is very large, therefore, I dumped all the noodles in at once. I did add two cubes of frozen chicken broth (from another cooking adventure) in the skillet before adding the noodles, to loosen up all the charred detritus on the bottom of the skillet. Totally optional and does not make it watery...because the high heat pretty much evaporates the broth as soon as it melts. I added the required amount of sauce, plus another tablespoon of the vinegar and then let it be. I like crunchy noodly stuff. It proceeded to stick to the entire bottom of the pan. Yay. I scraped it off with the lovely spatula.

Add the other stuff back in and toss in the rest of the sauce if you have any left and stir it all to warm it all through...about another 2-3 mintues, tops.

EAT!!!!!!!!!!

Results? Flavor, overall, was good. Chicken texture? Weird. I don't know if it was the chicken itself or the baking soda bath, but something was funky about how it felt to chew it. I had that happen when making General Tso's, with one of those flavoring packs, once. I think, for next time, I may just skip the baking soda bath, make double the sauce and use half of it to marinate the chicken first, for a good hour or so. If I do, I'll let you know if there's any difference! Best part, when served hot, was the noodles. It's ok warmish, but it tasted the best right out of the pan.
So, as Mr. Kimball likes to say....There you have it. My take on their probably very perfect recipe. I know I don't have the most beautiful, magazine-worthy, upscale food blog in the universe. I just try to show you how things REALLY look when this very real, very imperfect person makes them. I won't lie to you about how things taste or look or feel or anything else. So, if you're up for a culinary adventure and you have a really good skillet, try this.

